Thursday, September 29, 2011

How to Grow Shiitake Mushrooms

Out of all the classes we attended at the Mother Earth News Fair, this had to be one of my favorites.  I've been thinking about growing mushrooms for the past several months, not only because Hubs is a fanatical mushroom lover, but because it's my dream to be in business for myself so I can quit my job and focus on my family.  I had been doing some research and found that I could set up my own mushroom "farm" in our basement to grow mushrooms such as morels, oysters, and "buttons."  I hadn't gotten around to researching shiitake mushrooms yet, so I really wanted to attend this class.  I'm really glad I did--the instructor was informative, energized, and pretty darn hilarious.  I expected the class to be taught by some vegan hippie, only to find a guy in his mid-fifties, non-vegan, and who had a personality somewhat like my dad's was.  He was very matter-of-fact about how dicey mushroom farming can be, but he also talked about how much fun it could be.  So, here's what I learned about shiitake mushrooms and mushroom farming:

Shiitake mushrooms originated in Japan.  The word "Shiitake" comes from two Japanese words:  "Shii" = oak tree and "take" = mushroom.  So, literally, shiitake are "oak mushrooms," named for the type of tree the mushrooms grow on in Japan.    I lived in Japan for 3.5 years so I knew "take" means mushroom, but I didn't know about the "shii" part. You learn something new every day!

Shiitake are not only delicious, but they also have many different uses.  According to ShiitakeMushroomLog.com, "Shiitakes are high in protein, vitamins, and minerals. Fresh and dried shiitake mushrooms are used nutritionally to fight cancer, fibrocystic breast disease, high blood pressure, and viruses, and to help strengthen the immune system, improve circulation, and reduce cholesterol."  Now, I don't claim to be a doctor or health professional so take this info with a grain of salt.  I did a little research and found that shiitake mushrooms ARE used as an anti-cancer treatment so perhaps there is something to it.  I just like how they taste!


Shiitake mushrooms growing on a log


Basically, shiitake mushrooms are grown on oak logs.  But, according to our instructor, you can also use elm, pin oaks, sweet gum, yellow hornbeam, hard poplar, white ash, beech, sycamore, willows, and aspen logs.  You have to cut your logs in the cooler months (October-March) so any spore from other mushrooms can die off and won't interfere with your shiitake spore.  Logs should be about 3-4 feet long and about 6" in diameter--basically big enough to grow mushrooms, but not so big that you can't pick them up and carry them.  You want to choose logs that have medium density bark so your mushrooms can grow easily on them but other fungi/bacteria can't.  Also, about two to three weeks before you are ready to get started growing mushrooms on your logs, you need to either soak them in non-chlorinated water overnight or douse them really well with a garden hose a couple of times a week before you start the growing process.  This will ensure your logs have enough moisture content to support growing mushrooms.  You must not use chlorinated water or it will kill your mushroom spores! 

Our instructor recommended ordering our shiitake spore from a company called Field & Forest. www.fieldforest.net  I've checked them out and they seem to be reasonably priced.  Our instructor has worked with them for years and swears by them. Basically, the process of "seeding" your logs with mushroom spores is called "inoculating" your logs.  Usually you want to do your inoculation in the spring, when the weather starts warming up, usually after your last frost.  Temps should definitely be above freezing before you try this.  Inoculation occurs when you've drilled holes in your log and you plug the holes with the mushroom spores.  Holes should be drilled about 6" apart and to a depth of about 3/4" to 1 and 1/4" inch deep.  Our instructor has a drill with a bit in it that has a "stop" in it for 7/16."  He says it's a lot easier than trying to measure.  Here is a photo of a mushroom log drilled filled with plugs:

Basically, to inoculate your logs, you plug the spore into each hole, hammer it in until it is flush with the surface of the log, and then seal it with either a wooden dowel (as seen in above photo) or you seal the holes with wax, using a small paintbrush to apply the wax.  Our instructor swears by using beeswax (natural, no chemicals, etc) and since we have bees making beeswax right at this moment, that's probably what we'll use, too.  After your logs are plugged with your mushroom spore, you want to find a spot in your yard that is semi-shady and unlikely to be disturbed by kids or pets.  The instructor leans his logs up against his split rail fence under a grove of pine trees.  He recommends putting the logs under pines because they have less of a chance of contracting foreign fungi than if you stuck them under hardwood trees.

If you tend to live in a dry area, you'll want to make sure you water your logs regularly so the mushrooms can grow well.  Another thing I didn't know about growing mushrooms was that they are technical called a "fruit."  So when you force mushrooms to grow on a log, you are "fruiting" your logs. 

Apparently, shiitake need to be "shocked" into fruiting.  In Japan, the logs typically start fruiting after an earthquake or a heavy thunderstorm.  Since we don't normally have earthquakes here, (okay, that one last month was a complete fluke!) our instructor recommends "thumping" the logs--basically holding the log up and down (like a post-hole digger) and thumping the end on the ground.  He showed us a photo of a little experiment he did in which he set a group of logs aside, and out of that group, he thumped only half of the logs.  Sure enough, mushrooms only grew on the logs that he had thumped.  Interesting!

Other websites say you need to shock your logs into fruiting by soaking them in water that is 20 degrees cooler than the air temperature.  Some recommend sticking your logs in the fridge or freezer for 24 hours to force them to fruit.  Apparently, the colder the log gets, the more mushrooms you get.  Sounds kind of brutal to me, I'll probably stick with the thumping!

Once you've found a spot for your logs, you need to water them every once in awhile so they don't dry out.  The log is basically food for your mushrooms and the longer you can keep it around, the more mushrooms you'll get.  Some logs last up to 4-5 years with multiple "crops."  It may take up to a year and a half after you inoculate your logs with mushroom spores for you to actually harvest any mushrooms, it just depends on your climate, log choice, etc.  In the wintertime, depending on your climate, you may want to cover your logs with straw or hay; do not use plastic tarps--they encourage mold growth.

So, in a nutshell, here's a quick and dirty description of the process.  Cut your logs, order your spore, soak your logs, drill your logs, plug your logs with mushroom spore, seal the plugs with beeswax and put your logs in a shady part of your yard that still gets some light.  Water and thump them regularly to encourage fruiting.  You should see mushrooms in anywhere from 9 months to a year and a half.  Good luck!


Shiitake Mushroom Recipe:

Shiitake Mushroom and Cheddar Soup, serves 8

Ingredients:

  • 4 slices bacon, chopped
  • 1/2 white onion, chopped
  • 1 pound shiitake mushrooms, sliced
  • 2 cloves garlic, minced
  • black pepper to taste
  • 2 leaves fresh sage, chopped
  • 6 cups beef broth
  • 1 cup shredded Cheddar cheese

Directions:

  1. Place the bacon in a large saucepan, and cook over medium-high heat, stirring occasionally until crisp, about 5 minutes. Stir the onion into the pan; cook until soft, about 5 minutes. Stir in the mushrooms, garlic, pepper, and sage; cook over medium heat until the mushrooms begin to brown, about 10 minutes.
  2. Pour in broth; bring to simmer. Simmer soup for 10 minutes. Reduce heat to low, sprinkle in Cheddar cheese; stir until melted.  You can garnish the soup with sliced shiitakes for presentation if you like.
Our instructor says that he prefers to dry his mushrooms and rehydrate them when he needs them.  He said a lot of people dismiss the stems as being too tough but he's figured out a way to use the stems, too.  He dries the stems, then uses his food processor to make a powder out of the stems.  He then adds cream, and garlic to make a cream sauce for anything from lasagna to lobster.

Another website recommended by our instructor is Fungi Perfecti http://www.fungi.com/  I just went there and found out that the wacky-looking mushrooms on my front lawn are called "Turkey Tail" mushrooms.  I guess they do sort of look like a male turkey's plumage.  I also found out through my research that the Asian markets love to buy shiitake that have been been "frostbit."  Apparently, they think it makes the mushrooms taste better and that they are more potent than regular shiitake mushrooms. 

Finally, I thought this quote from our instructor was quite funny:  "All mushrooms are edible; some only once." --Old Croatian saying

Delicious Soup I Made for My Sick Hubs...in only 40 minutes!

As everyone knows, Hubs and I contracted a humdinger of a stomach bug while we were at the Mother Earth News Fair this past weekend.  I'm not blaming the fair, by any means, it could just be that we got it from touching a dirty doorknob or something.  I had a much lighter case of it than Hubs did--he actually was thisclose from being hospitalized!  Two bags of saline and some anti-nausea medication and he was almost back to 100%.  He still wasn't feeling that great last night and the doctor said that due to some blood loss from the diarrhea, he should stick to soups and liquids, preferably beef-based soups to help him build back up his iron levels, due to the anemia.  So, you know me, I had to go all out and create a tasty soup for my invalid Hubs.  A little research on the internet and a little perusing through my personal recipes, and I came up with this delicious soup which made a full, satisfying meal for the rest of the family, and a delicious broth for my Hubs.  In the end, everyone was happy!

Beef and Noodle Soup
Ingredients:
1 lb. stew beef, cubed into 1" squares
1/2 lb. Ditalini pasta (the little pasta you see in Olive Garden's pasta fagioli)
3 carrots, scraped and cut into 1/4" rounds
2 stalks of celery, cut into 1/4" squares
1 medium onion, diced
1 teaspoon minced garlic
2 bay leaves
2 tsp. Worcestershire sauce (divided)
8 C. beef stock, divided in half
1 tsp. salt
1/2 tsp. pepper
2 tsp. Penzey's Northwoods seasoning http://www.penzeys.com/cgi-bin/penzeys/p-penzeysnorthwoods.html

Preparation:

I used my pressure cooker for this recipe and the result is some really tender, tender beef.  You could use a slow cooker or just put it in a pot on the stove, but it takes sooooo much longer and I find the beef isn't as tender.  When you cook meat in a pressure cooker, you don't even need a knife to cook it, it's that tender.  If you want to do the recipe in a pot or slow cooker, just throw all of the ingredients at one time (except for the pasta--add that in during the last 30 minutes or so) and simmer for about 4-6 hours or until the beef is tender. 

Place beef, all vegetables, bay leaves, Worcestershire sauce, and other spices, and 4 C. of beef stock in your pressure cooker.  Check to make sure gasket is intact and vents are clear.  Place lid on cooker, close securely and put on high heat on your stove.  When jigger starts jiggling or starts releasing steam, turn heat down just a bit so the steam isn't constantly pouring out of the vents.  (about 1/4 of the way down from high on my electric stove)  Set your timer for 30 minutes.  After 30 minutes, take your pressure cooker and run it under cold water in the sink for about 5 minutes or until you can open the cooker.

Put cooker back on the stove burner without lid, add the other 4 C. of beef stock and bring to a boil.  Once soup is boiling, add pasta.  Cook until pasta is al dente.  Pick out bay leaves before serving.  Serve soup with a nice crusty bread.  Use a strainer to strain out veggies and to create a hearty broth for sick folks.  Even more delicious the next day--I'm having it for lunch later today!  Enjoy!

Wednesday, September 28, 2011

Preserving/Canning Tips from the Mother Earth News Fair

Everyone who knows me, knows how much I like to can.  I learned how at an early age from my grandma and it "stuck."  I've probably been canning for my family for about 20 years now and I was thinking I was pretty good at it--after all, no one who has eaten my canned food has died yet, so I must be doing things right.  Well, then came the Mother Earth News Fair, where I attended two classes on preserving food, and I realized I didn't know everything there is to know about canning after all!

I'll give a brief explanation of the easiest, safest ways to can and then pass on some tips I learned at the fair.

Canning Basics
There are two methods of canning; the boiling water bath method and the pressure canning method.  Boiling water bath canning is for foods that are high in acid content such as fruits, vegetables that have some sort of pickling aspect in their recipe, and tomatoes that have had some sort of acid added to them, be it lemon juice or vinegar.  Pressure canning is used for all meat, dairy products, seafood, poultry, and all vegetables that haven't been pickled.  Never use the boiling water method for canning any meats/dairy, etc. or you will be sure to poison your family!

I know a lot of people are intimidated by pressure cookers and/or pressure canners, but the technology used in today's pressure cookers/canners is vastly improved upon the type our moms or grandmas used.  Whenever I mention I cooked something in a pressure cooker, I always get asked, "But, doesn't that make you nervous?"  My answer is always NO.  Pressure cookers/canners have all sorts of reliable safety systems built in to avoid some of the problems in the past.  Companies who manufacture this equipment certainly wouldn't appreciate their customers getting blown up in their kitchens!  Take some time to research the best pressure cooker/canner for your own use and when you get it, read the instruction manual carefully to ensure you are familiar with your equipment.  I've used a pressure cooker for 20 years and I haven't exploded yet!

Equipment:

-A pressure canner if you are preserving meats, dairy, poultry, vegetables that aren't pickled.

A pressure canner such as this runs around $150-$200 brand new but you can find some  on E-Bay
-A large stock pot with a tightly fitting lid, if you're doing the boiling water method.
-A rack (either wooden or metal) for the bottom of the stockpot so water can circulate under and around your canning jars
-Canning jars.  Mason or Ball jars are the best choice for canning and they can be used over and over again, provided there are no nicks or cracks in the jars.  I usually find the quart jars to be best when I'm canning things like tomato sauce or chili, and the pint jars to be the best when I'm making jam or jelly.  If I have to buy new jars, I find Walmart to be good on prices but I just saw our new Wegmans sells jars at a pretty good price, too.  I've also bought canning jars at yard sales and haven't had a problem with them yet.  You must buy new lids for your jars, though, as they can not be reused, no matter what.  A company called Tattler sells reusable canning jar lids that are made out of plastic, http://www.reusablecanninglids.com/ but I haven't tried them myself so I have no idea of how well they work.
-Canning accessories.  These are the tools you will use in the canning process for either canning method
Clockwise, from top:  canning tongs, funnel, jar packer, lid wand
Canning tongs:  allow you to safely remove jars from hot water
Funnel:  fits snugly on jar rim, allowing you to pack your jars neatly and not get food on the jar rims (food left on rims doesn't allow for a tight seal)
Jar Packer:  okay, it really does have some fancy proper name but I can't remember what it is so I've always called it a jar packer.  Basically, you use this tool to push/pack the foods into the jars tightly (so they don't float) and to remove air bubbles from your jars.  You can also just use a chopstick if you don't want to buy this tool.
Lid Wand:  this handy-dandy tool has a magnet on the end of it and it is perfect for removing lids and rings from their hot water soak.  Before I got this tool, I used to spend many frustrating minutes chasing lids and rings around the bottom of my stock pot with a chopstick.
Kitchen Towels and Paper Towels:  since canning involves water, it's a good idea to have kitchen towels handing for sopping up any wayward water spills.  I also keep paper towels on hand for wiping the rims of my jars before putting the lids on so I don't get any lint or fuzz on the jars (like you might with a regular cloth towel).
Kitchen Timer:  you need to keep track of your processing time.  I once got distracted making pickles and the result was that my pickles turned out soggy from me leaving them in the hot water longer than I was supposed to.  I was only supposed to "blanch" them and I ended up boiling them instead!
Cookie Sheets:  I keep a few cookie sheets around during canning so I have a way to transport a bunch of jars from say, the kitchen counter to the kitchen table so I can free up space on my counters.
Kosher Salt or Pickling Salt:  never use just plain old salt.  It usually is iodized and that can give a metallic taste to your canned foods or even change the color of your pickling brine.  I can usually find either at the grocery store, but if you're having trouble, just ask them to point you in the direction of the Kosher food section and you should be able to find it there.
-Choose your recipe.  I use the Ball preserving recipe book and have had good results.  They have a great website, too which has a lot of good information on canning and some really good recipes:  http://www.freshpreserving.com/recipes.aspx  It's not a good idea to follow the guidelines for canning in old family recipes.  For instance, you could use an old recipe for jam (which I have) but make sure the amount of sugar, pectin, etc. matches up to a recipe from today so you're conforming to today's canning standards.  For instance, I had to use 1/2 the sugar but double the pectin.  It took a few tries but I finally got it right.
-Use high-quality and fresh ingredients.  Don't can fruits or veggies that are wilting or just about to bite the dust.  Trust me, the only thing worse than eating crappy rotten fruit/vegs today, is opening a jar of crappy rotten fruit/vegs six months from now.  Yuck!

Boiling Water Canning Method:

Wash your lids, rings, and canning jars in hot, sudsy water.  Rinse with warm water and then leave on a kitchen towel to dry. You don't need to sterilize everything ahead of time; the boiling water during processing will do that for you.

Now rather than try and tell you step-by-step what to do, because I am lazy, I'm just going to copy/paste instructions from the canning website I like to use.  http://www.canning-food-recipes.com  I could re-word it so it sounds like my own but they say it so well and I couldn't do a better job if I tried.  So here goes:

Equipment Preparation

Wash and assemble canning equipment, utensils and containers. Make sure you have everything that you need before you start fruit preparation. Once you begin the canning process you need to work as quickly as possible without delays.

Ball Canning Jars

Use authentic Mason or Ball canner jars. Examine and discard those with nicks, cracks and rough edges. These defects will not permit an air-tight seal. All jars should be washed in hot soapy water, rinsed well and then kept hot. This can be done in a dishwasher or by placing the jars in the water that is heating in your canner. The jars need to be kept hot to prevent breakage when they are filled with a hot product and placed in the kettle for processing.

Jars that will be filled with food and processed for less than 10 minutes in a boiling water bath canner need to be sterilized by boiling in water for 10 minutes. NOTE: If you are at an altitude of 1000 feet or more, boil an additional minute for each additional 1000 feet of altitude. (i.e.) 5000 feet=5 minutes longer.


Fruit Preparation

Gather fruit and vegetables early in the morning when they are at their peak of quality. Do not use over-ripe products. Gather or purchase only as much as you can prepare within 2 or 3 hours.

Wash products by either quick soaking and/or rinsing making sure to remove all dirt and sand including any chemicals that may be present. Dirt contains some of the bacteria that are hardest to kill. The cleaner the raw foods, the more effective the preserving process. Do not can decayed or damaged fruit. Do not let the food soak; it will lose flavor and nutrients.


Water Bath Canners

Fill the kettle with the appropriate amount of hot water and begin heating it on the range. The water bath requires 1 to 2 inches of water above the tops of jars. This can be difficult to determine before the filled jars are in place but after a batch or two you will learn how much water you you have to add. It is always a good idea to have an extra small pot of water heating just in case.

Packing Jars

Raw Pack (Cold Pack)

Pack raw fruit into jars and cover with boiling hot sugar syrup, juice or water. It is necessary to leave a head space between the lid and the top of food or liquid. This space is needed for the bubbling of liquidshead space 
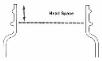
and fruit expansion. If the jars are filled too full the contents may overflow during processing. The amount of head space is usually between 1/8 and 1/2 inch. Check the individual recipe for the exact amount of head space.

Hot Pack

Heat fruit in syrup, in water or over steam before packing. Fruits with a high juice content and tomatoes can be pre-heated without adding liquid and then packed in the juice that cooks out.

To Fill Jars

Pack each jar to within 1/4 inch of top or as specified in individual recipe. For non-liquid foods(ie. peaches) it is necessary to remove any trapped air bubbles by running a rubber spatula or table knife gently between the solid product and the edge of the jar. Add more hot syrup as needed. Wipe rim and screw threads with a clean damp cloth, place lid on top and screw bands on tightly and evenly to hold rubber sealing lid (or sealing ring) in place. Sometimes it is necessary to position and hold down sealing lid while you tighten the band to insure the lid is centered on the top of the jar. Do not over-tighten. Jars are then ready to be placed on the rack inside hot water canner.

General Processing

Water Bath Method

Place jars on rack immediately after packing. Lower filled rack into canner. Jars should be covered by 1 to 2 inches of water. Add additional boiling water if needed. If you add more water, pour between jars and not directly on them (this is where the extra pot of heated water comes in handy). Cover pot with lid. When the water comes to a rolling boil, start to count the processing time. Boil gently and steadily for the time recommended for the food being processed. When the cooking time is up, remove jars at once and place on a rack or on towels away from heat and away from any draft.

Test for Seal

After jars have cooled between 12 and 24 hours after processing, check seal. To do this press down on the center of the lid. The lid should be con-caved and not move when pressed. Another method is to tap the lid with the bottom of a teaspoon. If the jar is sealed correctly, it will make a high-pitched sound. If it makes a dull sound it means the lid is not sealed or possibly that food is in contact with the underside of the lid. Do not be alarmed if during the first the first hour or so of cooling if you hear a popping sound come from the jars. This is a good sound to hear as it most often means that the vacuum effect has taken place which causes the lids to pop down and seal.

After jars have cooled thoroughly, the screw bands may be removed if desired. Be sure to label canned jars with content and processing date. Store jars in a cool dark, dry place.


If fruit is not covered by liquid it may darken during storage but does not necessarily mean it is spoiled. To avoid this be sure fruit is covered by remove air bubbles from jars 
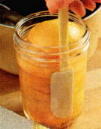
liquid while still leaving the recommended head space. Also be sure to remove trapped air bubbles with a slim rubber scraper, spatula or kitchen knife. To do this effectively, tilt the jar slightly while running the tool between the fruit and the edge of the jar and also pressing inward against the fruit a few times.

A spatula-shaped wooden spoon that has a flat end instead of rounded, is good to have for stirring sugar syrup in a flat bottomed pan during the cooking process.

Avoid storing canned food near a furnace, water heater or hot water pipes. Jars need to be kept cool for longer storage life and to protect against spoilage. Be sure to store in a dry place. Rusting of the lid or band can cause seal to break.


Sugar Syrup

Syrup Sugar Water Yield
Light 2 cups 4 cups 5 cups
Medium 3 cups 4 cups 5 1/2 cups
Heavy 4 3/4 cups 4 cups 6 1/2 cups

To prepare syrup, while heating water, add sugar slowly, stirring constantly to dissolve. Bring to a gentle boil. Fill jars while syrup is still boiling hot.


Good Things to Know

Canned fruits oftentimes will float if the sugar syrup is too heavy, if jars are packed too loosely or if air remains in the tissues of the fruit after processing. To avoid this use a light or medium sugar syrup, make sure fruit is firm and ripe and pack fruit tightly in jars without crushing.

Canned peaches, pears and apples may show a blue, red or pink color change after processing. This is sometimes the result of natural chemical changes that occur as fruits are heated.

Tips I Learned at the Fair, Some of Which I Never Knew Before!
I admit it, you CAN teach an old dog new tricks, and this old lady hound sure did get schooled at the fair!

-Lift your jars straight up out of the water, don't tilt them to get the water off (I admit, I have always done this!) The water will evaporate off the lids while the jars are cooling.  Tilting the jars could push food up into the headspace.  Whoops!  Guess I'll be pulling my jars straight up and out of the water from now on.
-After 24 hours, once you have confirmed your jars have sealed, you're supposed to take the rings off the jars before storing them.  Otherwise, moisture could build up under there and you could end up with rust, which could erode your seal.  Good thing there's no such thing as the Canning Police or I would be in some serious trouble if they took a gander down in my basement and saw all of my numerous canning jars with rings still on them.  That's a big oops 10-4 right there!
-Canning jars can be FROZEN, lids and all!  I have made freezer jam with those plastic freezer canning containers before but I never knew you could freeze the actual glass jars before.  This tip really would have come in handy that time my veggies didn't seal right and I was forcing everyone to eat tons of veggies every day to use them up before they went bad!  Probably not a good idea for things like pickles, though.  I imagine they'd probably turn to mush.

Finally, to round out our boiling water canning method discussion, here's a recipe given to us by one of our canning instructors at the fair.  Her name is Sherri Brooks Vinton and this recipe comes from her new book, "Put 'em Up!, a Comprehensive Home Preserving Guide for the Creative Cook. From Drying and Freezing to Canning and Pickling."  I reallllly wanted to pick up Sherri's book at the fair as she was so knowledgeable and pretty down to earth, but I waited too long and they sold out.  I'll have to see if I can find it online.  Anyhow, here's Sherri's recipe for Spicy Carrots:

Spicy Carrots
Ingredients:
4-6 garlic cloves, sliced
1-2 jalapeno peppers, sliced, with seeds
1 tsp. red pepper flakes (optional)
2 lbs. carrots
4 C. distilled white vinegar
1 C. sugar
3 TBSP. Kosher salt

Prepare:
1. divide the garlic, sliced jalapenos, and pepper flakes (if using), among three clean, hot, pint canning jars.  Trim, peel, and cut the carrots 1 inch shorter than the height of the jars.  Pack the carrots into jars.
2. bring the vinegar to a boil in a large non-reactive saucepan.  Add the sugar and salt and stir to dissolve.  Pour the brine over the carrots, covering the vegetables by 1/2 inch with liquid.  Leave 1/2 inch of headspace between the top of the liquid and the rim of the jar.

Can:
Use the boiling water method.  Release trapped air bubbles.  Wipe the rims clean; center lids on the jars and screw on jar bands, just until they are secure--do not tighten!  Process for 15 minutes (from when the water starts to boil).  Turn off heat, remove canner lid, and let jars rest in the water for 5 minutes.  Remove jars and set aside for 24 hours.  Check seals, then store in a cool, dark place for up to one year.

Pressure Canning
Once again, I bow to the expertise of the folks at Canning Food Recipes.com and give you their directions for pressure canning:

Follow manufacturer's instructions for opening and closing the pressure canner. Have 2 to 3 inches of hot water in pressure canner and stand the jars on the rack insert so they are not touching each other or the sides of the pot. Fasten lid and turn on heat. Steam, mixed with air, will start to flow from the vent. This is about 8 to 10 minutes after the first sign of steam. As the air is driven out from the canner, the steam will change from a white vapor or cloud to nearly invisible.

Start processing time when pressure has been reached or when weighted gauge begins to rock. It is then time to close the the pet-cock or regulator. Maintain a steady pressure during processing.

When processing time is up, remove the canner from heat and let the pressure return to zero without assistance. Standard heavy-walled canners take about 30 minutes when loaded with pints and about 45 minutes when loaded with quarts. Do not attempt to cool pot with cold water. This can cause liquid to escape from jars and keep lids from properly sealing. It can also cause pot warpage.

After pressure reaches zero, wait 2 minutes longer and then slowly open or remove the pet-cock or regulator. Unfasten cover and tilt the far side up so any steam remaining will escape away from you. Using a jar lifter, remove each jar and place on a dry, non-metallic surface or towel. Leave space between jars for air circulation.

After jars have cooled,
test for seal and the screw bands may be removed if desired. Be sure to label canned jars with content and processing date. Store jars in a cool dark, dry place.

Processing Times

Processing, or canning times, are usually for an altitude of 0 to 1000 feet. If you are canning at a higher altitude, the times will need to be increased. This is because water has a lower boiling point at higher altitudes. Because of the lower boiling temperature the processing time is increased to ensure that the harmful bacteria is destroyed.

Water Bath Canner

For the Boiling Water Bath method, process an additional minute for each 1000 feet in elevation. (i.e.) 5000 feet=5 additional minutes of processing time.

Dial Gauge Pressure Canner

For pressure canning at higher altitudes the time remains the same but the pressure needs to be increased.
2000 to 4000 feet, 12 pounds pressure.
4000 to 6000 feet, 13 pounds pressure.
6000 to 8000 feet, 14 pounds pressure.


I find that I enjoy pressure canning more than the boiling water method.  It's less messy and you know for sure your food is being safely processed.  Plus, you don't have to constantly check to make sure there's enough water covering your jars or add water if it runs low.  There's also something kind of satisfying about harnessing the power of steam in your kitchen.  Must be something that rubbed off from Hubs taking me to see so many steam trains over the years!  So that's all for today's lesson, folks.  If you have any favorite canning recipes or tips, please leave them in the comments section or shoot me an email rebeccacichonowicz@gmail.com and I'll include them in my blog.  Thanks again for reading!  The next "lesson" will be on how to grow Shitake mushrooms. :)

Monday, September 26, 2011

Overview of the Mother Earth News Fair Sept. 24-25, 2011

Hubs and I spent the weekend visiting the Mother Earth News Fair at the Seven Springs Resort in Somerset, PA.  The resort is about a four-hour drive from our house so we decided to stay at the Laurel Hill State Park campground, about five miles from the resort.  We got there around 9 p.m. on Friday night and had to set up camp in the dark.  Luckily, we have some really good lanterns so we were able to set up pretty quickly.

The campground was really nice with spacious lots, large picnic tables, and electric hookups.  They also had a decent bathhouse with plenty of toilets and several showers.  Unfortunately, we had some rather rude neighbors in the next campsite over.  They brought their dog with them and he proceeded to whine the entire night long as his "family" made him sleep outside of their (air-conditioned) camper, leaving him to stay outside in the elements (it rained quite a lot).  Then, if that wasn't bad enough, these rude people also had two badly behaving toddlers who spent the night alternatively screeching at or fighting with each other.

When you add to that Hub's snoring (he can sleep through ANYTHING after being stationed onboard Navy ships) and the screeching of numerous Great Horned Owls who were roosting above our campsite, you can bet I didn't get much sleep.  I actually didn't mind the owls too much; I thought they were fascinating, so you know I just had to Google them to find out why they were doing and why, and that kept me up, too.

Once I finally got to sleep, I was abruptly awoken by the inconsiderate campers next site over--again--as apparently, they had set their alarm clock for three a.m. on a previous occasion and had forgotten to change it back now that they were on vacation.  They must have hit snooze a half dozen times before they realized that they didn't need to get up and they shut it off.  I was finally able to get to sleep around 4:30 a.m., only to be rudely awoken at 6 a.m. by the sounds of a "See 'n' Say" and a "Speak 'n' Spell"--both toys I normally approve of, but at that moment, I wanted to set them (and their owners!) on fire.

We finally got up and got going around 9 a.m.  We left for the fair and found that it was only about five miles from our campground.  On the way to the resort, we noticed that the trees, hills, and houses/farms reminded us a lot of the countryside we see in Vermont.  We arrived at the fair shortly after 10 a.m. and only had to wait about 20 minutes or so in traffic before we could find a parking spot.  The resort provided shuttle buses (school buses) for us to get down to the area where the fair actually was.  It only took about five minutes for us to get to the main gate.

The main entrance was unique in that it was covered by a huge, round dome which was "wrapped" to look like planet Earth.  It was really neat to see.  (Pictures to follow once I can download them from Hub's IPhone... he ended up coming down with food poisoning yesterday and has been sick all day long).  Since we had pre-ordered our tickets, we were able to walk right in.  When we were given our red wristband (indicating we had a weekend pass) we were also given free environmentally-safe laundry detergent samples and our programs--which were the size of magazines.  We had already perused the program online so we'd have an idea of what to expect, but it was nice having it printed out (on 100% post-recycled content, no less) so we could map out our plan of attack.

Many, many classes/lectures/how-to's were offered and it was difficult to choose among them.  There were sessions on everything from Aquaponics to Hunting Deer for Food and from Guerilla Gardening to Urban Agriculture. We decided in the end to go with what we were most interested in learning about and what we needed the most assistance in accomplishing.  We also divided and conquered; some classes we both went to, and others, to maximize our time, we attended separately.  Here's a list of the sessions we did attend--the instructor's/speaker's name(s) are in italics, the ones who have a * by their names also have a book published on the same subject--you can find these books on the Mother Earth News bookshelf:  http://www.motherearthnews.com/Organic-Gardening/1978-01-01/Mothers-Bookshelf.aspx

Saturday:

Sustainable and Natural Beekeeping Workshop  James Zitting
When Technology Fails:  Self-Reliance and Surviving the Long Emergency  Matthew Stein*
When Disaster Strikes:  What You Need to Know, Do, and Have on Hand  Matthew Stein*Food Preservation for the Faint of Heart  Kathy Harrison*
Seed Saving and Storage  Heather Mikulas
Small-Scale Home Butchering  Matt Wilkinson
The Gourmet Butcher  Cole Ward

Sunday:

Food Gone Wild:  Recognizing and Identifying Wild Foods  Faith Starr and David Fish
Food Gone Wild:  Foraging On-Site Edible Plants Walk  Faith Starr and David Fish
Put 'em Up!  Classic Preserves, Modern Twist  Sherri Brooks Vinton*
Solar Electricity Basics  Dan Chiras
Making Cheese in Your Kitchen  David and Terry Rice
Shitake Mushrooms:  Growing, Harvesting, and Preserving  Claire and Rusty Orner
Egg Production:  It's Not All About the Chickens  Jeannette Beranger

I will be summarizing each session in a separate blog post as there was so much information that is too good not to pass on to everyone.  Each session provided really good information along with recipes and invaluable instructions.  Please check back over the next few days to learn some really cool stuff!

The layout...

The staff of the Seven Springs Resort/Mother Earth News Fair really did a great job of making sure there was enough accurate signage to direct you to where you needed to go and there were plenty of easily located/clean restrooms all over the fair.  (Anyone who knows my Hubs knows how crucial this fact is).  The fair didn't feel bunched up or crowed at all due to the fact that the different sessions, exhibits, displays, etc. were spread out between numerous outdoor stages, spacious indoor classroom/lecture halls, and three floors of a rather large exhibition center.

One of the only complaints Hubs and I had about the fair was with the fact that visitor attendance was severely underestimated and it was standing room only at most of the outdoor venues and in some of the indoor classrooms.  For example, a lot of people must have been interested in/concerned about technology failing as our When Technology Fails session was so packed, we ended up sitting on the floor!  I heard several staffers remark during the weekend that attendance was double what it was at the same venue last year.  I think the organizers ought to take this into account when they are planning next year's fair.

The other teensy complaint we had about the fair was the small amount of food vendors available for attendees.  This led to sometimes extremely long lines for food, which led us to skip a session or two over the weekend because we had to eat.  On the other hand, the small amount of food they DID have was really delicious.  The first day, we had all-organic, local beef and vegetable kebabs with couscous and garlic hummus with pita bread.  Delicious!  The second day, we had organic local beef hamburgers with organic potato chips with salt & pepper, and a cheese platter made up of local Pennsylvania cheeses.  I have to say, it's been awhile since I had such fresh-tasting food!

We didn't need to buy drinks because they had a water "bar" where you could refill your water bottles with ice cold filtered spring water.  We brought our water bottles with us hidden in my purse (like I would at the movies!) but we soon found that they actually wanted us to get our water from the water bar instead of buying plastic disposable water bottles.  I wish more events (concerts, festivals, sporting events, etc.) would follow this practice.

The fair had its trash "boxes" organized by "Plastic Bottles," "Plastic Utensils & Refuse," "Paper," and "Food for Compost."  I was pleased to see that the plastic bottles box at each spot was practically empty.  Now THAT'S what I like!  The only downside I saw to this system was that there was nowhere to deposit metal or aluminum.  This became clear when I saw an elderly gentleman trying to figure out where he was supposed to deposit the piece of aluminum foil that his sandwich wrap had come in.  He read all of the signs, muttered to himself for a moment, then simply folded up his tinfoil into a neat little square and placed it on the ground in front of the boxes.  When I walked by there again later in the day, I noticed some more tinfoil and a few aluminum soda cans and glass bottles lined up in front of the box. Again, something the organizers might want to take into consideration for next year.

Demographic Observations/Trivia from the Mother Earth News Fair

-Probably 90% of the people attending the fair were of the Caucasian persuasion.  8% were Asian, and 1% were Hispanic.  I only saw two African-Americans during my two days at the fair.  Does this mean that only white folks care about the planet?  No.  In my opinion, it means the organizers need to do a better job of marketing the fair to people from all backgrounds to have a more diverse audience at the fair.  I have many friends from many different races and I know they feel the same way about the planet and environmentalism as I do, no matter what background they come from.

-Hubs and I were surprised to see less Hippies/Granolas than we were expecting.  Surprisingly, the attendees seemed to be right around our age, wearing normal clothes, and nary a dreadlock between them. (I only saw about 10 Caucasian-American folks with dreads the entire weekend, thank goodness.  Don't get me wrong, I think dreads look awesome on African-Americans and Rastafarians, but not-so-good on young, unwashed Caucasian-Americans.  In my opinion, dreads on C.A.s look like dirty, unwashed, snakes of indeterminate origin).

-The majority of attendees were dressed like us--jeans and casual t-shirts.  The rest of the clothing seemed to range from casual granola to full-fledged hippie wear (skirts made of burlap or handkerchiefs, in one instance).  The footwear was mostly comfortable sneakers/hikers, with more than a few Crocs and Ugg boots mixed in.  Hubs was surprised to see so many women and children wearing Wellington boots.  I think that was due more to the rain than a conscious fashion choice.

-There were more women than men in the cooking/canning classes.  There were more men than women in the renewable energy/tools classes.  Does this mean women belong in the kitchen and men should stay out in the garage with their tools?  Again, marketing could have helped in this matter by making the class/course descriptions sound more gender neutral and diverse.  The one man I saw in my canning class had come in there by accident (he sat next to me during the class) but told me afterwards he wished he had consciously sought to attend the class from the beginning, as it was full of valuable information.  As he was in his late-20's and not married yet, he didn't have a firm grasp on cooking skills, so attending this canning class taught him that he could can/freeze/dehydrate the leftovers of the food he did cook, thereby stretching his limited food budget expenses and saving him money.

-The fair was great for kids 7+.  There was a circus-type environmental sideshow for kids, a kids' treehouse/discovery play area, and the kids could participate (and did!) in an eco-parade where they shouted out that they were the game-changers and they wanted be environmentally conscious.   It was really inspiring to see so many young people interested in recycling, organic farming, and renewable energy.

-The fair is NOT good for kids under age 5.  Every baby I saw there was being toted around in either an uncomfortable backpack or stroller and 99% of them were fretting every time I saw them.  The unfortunate toddlers who had to walk (or were towed behind their parents on leashes--*disclaimer:  I towed my child on a leash as a toddler, too, but that's because he would take off at the drop of a hat, so I needed a way to corral him) were usually in tears, sobbing about something or another.  Simply put, it's not fair to drag babies & toddlers around a venue that isn't really designed for them.  Parents, do yourselves a favor and enjoy a kid-free weekend at next year's fair.  Trust me, you'll enjoy yourself a lot more and you'll be able to avoid the evil eyes from those of us who DID leave their kids at home, who are trying to enjoy a class/lecture but can't due to your baby/toddler crying through the whole thing.  If you MUST bring your baby/toddler, please, if your child starts acting up, be considerate and remove yourselves from the class/lecture.  It's not fair to the rest of the audience and it's certainly not fair to the instructor or speaker who has to try to compete with the wailing of your child.  Believe me, I love children of all ages, but there is a time and place for them, and this is not it.  Okay, I'm getting off my soapbox now!

Things We Learned from Attending the Mother Earth News Fair

-The food is tasty but it is expensive.  We bought a plate and a side and just asked for another plate and split our meal, saving us quite a bit more money than if we'd bought two separate entrees.

-Bring your own water bottle instead of buying expensive sodas or sports drinks.  They have water bars where you can refill your bottle with fresh, filtered, cold water.

-Study the map that comes in your program and write down all the classes you are taking on it so you can easily find them.  At most you only have about 15 minutes between sessions and they tend to fill up quick, so you need to be able to find your class fast in order to get a seat.

-Along with studying the map, determine alternate exits from each building/area.  The main entrances/exits tend to bottleneck when classes are due to start, so if you don't want to be late, find that little-known exit that will allow you to get to your class sooner.  Hubs and I found an exit that took us out of the main building through the resort's kitchen corridor and it was virtually undiscovered by anyone else but us and just a handful of people.

-If you have time, stay for the Q & A portion of each session.  We probably learned 50% of what we needed to know just from listening to people's questions and the instructor's/speaker's answers. 

So, dear readers, that's just the overview of the Mother Earth News Fair.  Tune in tomorrow for more posts on each individual session with tons of valuable information.